Linked Lists#
While we have spent the previous chapters learning some C++, this chapter marks the start of a new topic: the Algorithms and Data Structures part of the course. As mentioned, the main goal of learning C++ was to familiarize ourselves with C-style programming syntax. Through these following chapters, we will not cover new material in C++ but will use it to explore data structures.
Data Structures and Algorithms#
A data structure is how data is organized and managed. More precisely, it is about how a collection of data items are stored collectively, how they relate to each other, and what operations we can perform on them. Understanding data structures is important when making efficient programs, as different problems and implementations call for different data structures.
Algorithms are tightly connected to data structures. To implement a data structure, we need to understand the algorithms required to get that data structure to work. Additionally, implementing an algorithm to solve some problem will rely on what data structure one chooses to work with; different underlying structures call for different algorithms.
Data Structures and Algorithms are some of the fundamental topics of computer programming. This is reflected in the fact that there are numerous books and university classes called precisely “Data Structures and Algorithms” or “Algorithms and Data Structures.” Despite our discussion of the topic being brief, we aim to give a small taste and understanding of what a data structure is and why it is important.
Data Structures vs. Abstract Data Types#
Previously, we covered Dynamic Arrays, also known as Array Lists. Dynamic arrays are an example of a data structure, as they are a specification of how data values are to be stored and interacted with. When implementing a class in that chapter, we had to continuously alternate between thinking about how things worked from inside and outside the class, i.e., how the class is used.
We now want to formalize these concepts. The term data structure refers to the specific and concrete implementation of how data is represented and stored. It is a low-level construct that we must think about when implementing something.
When using the class, we instead talk about the data type or even the abstract data type (ADT). An abstract data type is, as the name implies, a more abstract definition and a mathematical model for the behavior of the construct from the user’s perspective. Specifically, it is the collection of possible values to be stored in the construct, the possible operations on that data, and the behavior of those operations.
A data structure is a low-level construct from the perspective of the implementer. In contrast, the abstract data type is a high-level construct built on top of the data structure, which is what the user interacts with.
An example of an abstract data type is the list ADT. This is a specification that a list is something that can store a sequence of elements, has methods to find the number of stored elements, methods for inserting or appending new elements, and so on. We are already familiar with this ADT, given that Python lists are a specific implementation of a list ADT. Another example of an ADT is the associative array. While this name might be unfamiliar, the reader has probably dealt with Python dictionaries, which are associative arrays.
Note that there are often several different underlying data structures when implementing a specific ADT. In the case of the list, dynamic arrays would be a natural choice, as we have already seen. Another option would be linked lists, a data structure we will cover in this chapter.
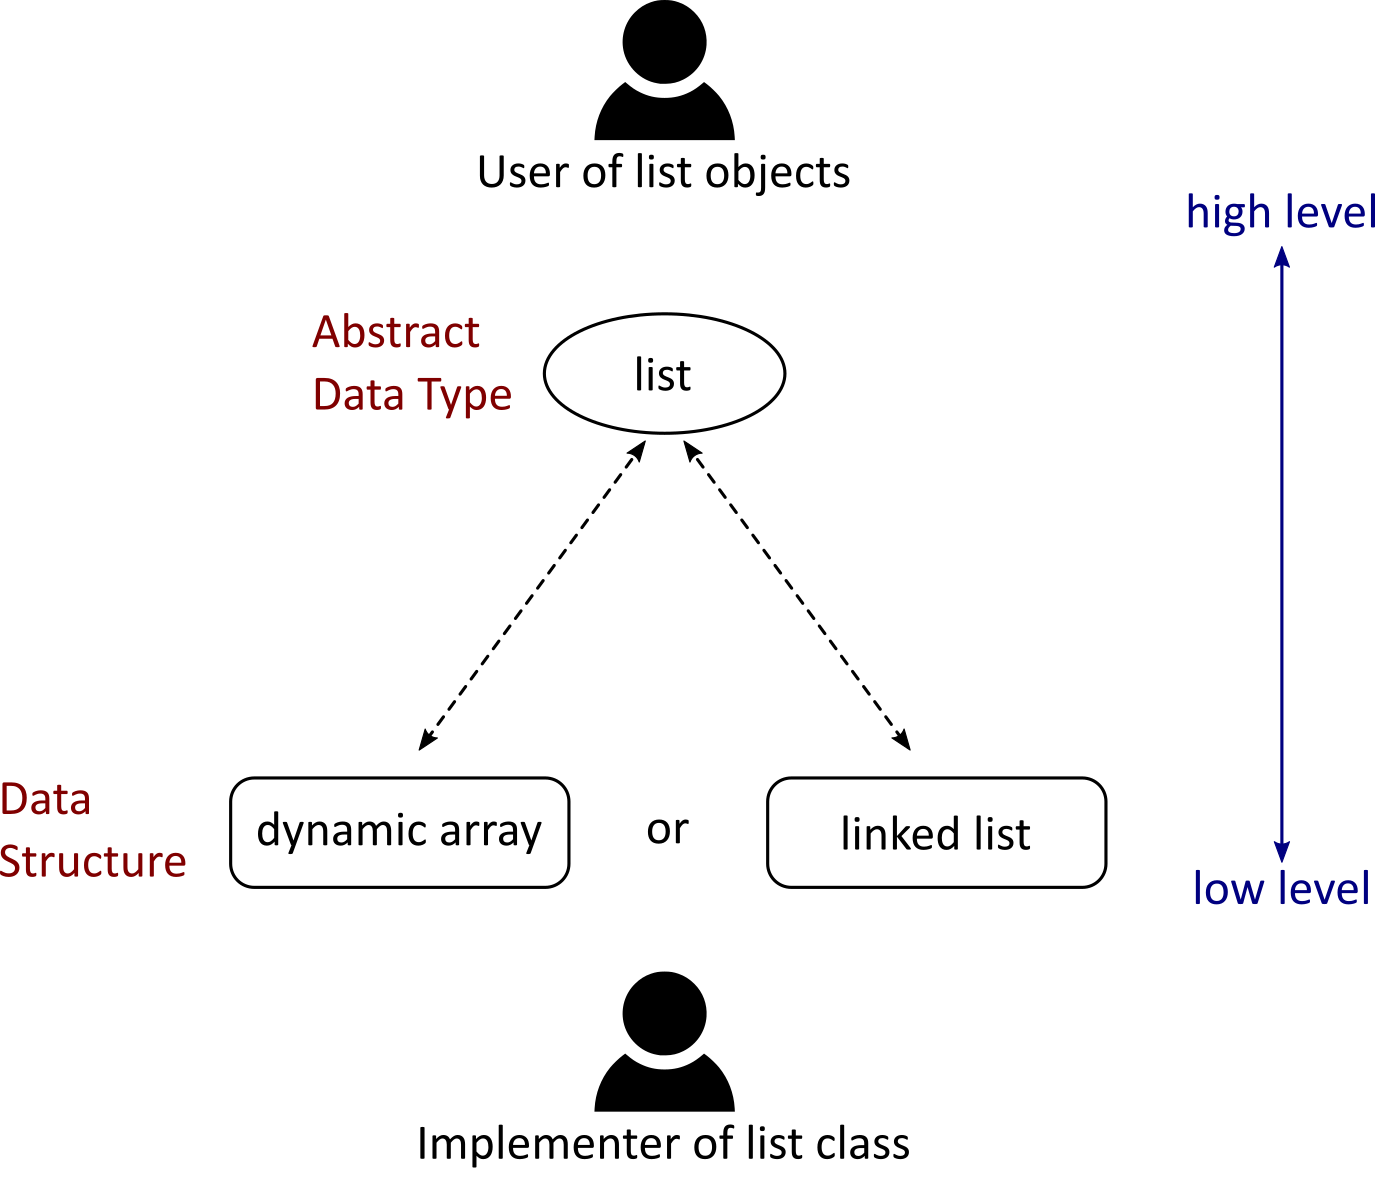
Fig. 30 An abstract data type is the interface the user has to interact with; it defines the possible operations on the data and how they behave. The underlying data structure is more specific to how data is represented and stored in memory and the implementer is usually the one who has to think about the data structure. As shown, different data structures can be used to implement a given ADT. Lists can, for example, be made with dynamic arrays or with linked list. This will be different from the perspective of the implementer, but, as the same operations are supported in both cases, the user does not think about the underlying data structure when using the class.#
Linked Lists#
We now turn to look at linked lists, an alternative data structure to dynamic arrays for implementing lists. Unlike dynamic arrays, linked lists do not rely on storing data in arrays. Instead, they store each list element in an individual structure called a node.
A node object stores the element’s value while also containing a pointer to another node. We can use this pointer to link different nodes to each other and create a linked list. In this chapter, we will only consider lists that store integers. However, the value field of the nodes can be changed to store any kind of object. In C++, it is best to use templating to define a single list class containing any type of data, but we disregard this here to keep things as simple as possible.
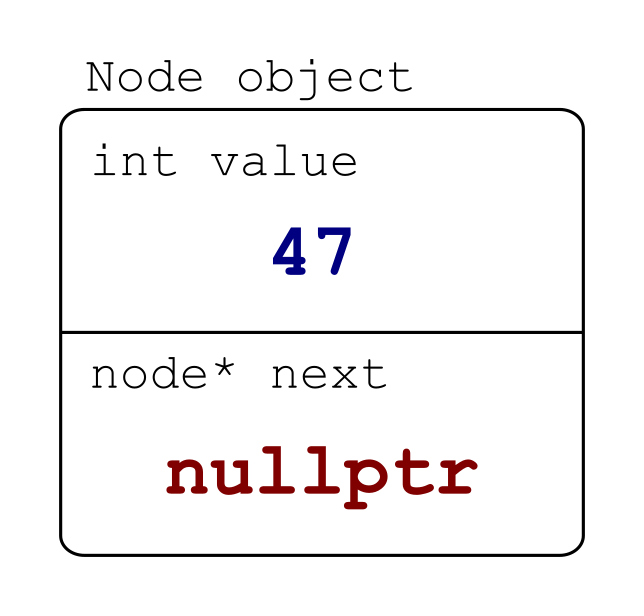
Fig. 31 A single node object.#
When linking a series of nodes, they form a linked list. We let the list end by having the final node point at a nullptr. For example, Figure An abstract data type is the interface the user has to interact with; it defines the possible operations on the data and how they behave. The underlying data structure is more specific to how data is represented and stored in memory and the implementer is usually the one who has to think about the data structure. As shown, different data structures can be used to implement a given ADT. Lists can, for example, be made with dynamic arrays or with linked list. This will be different from the perspective of the implementer, but, as the same operations are supported in both cases, the user does not think about the underlying data structure when using the class. shows a chain of linked nodes that correspond to a list [47, 3, 12, 99, 23].

Fig. 32 A chain of node objects.#
To simplify our drawings of the linked list, we change the nodes to simple circles, writing their value inside and representing the pointer as an arrow.

Fig. 33 A simplified drawing of a linked list.#
This structure defines a clear sequence of integer values. We can also iterate over this list. If we have a reference to the first value, we can print it and subsequently use the following pointer to move to the next element in the list.
Making the Nodes#
Implementing the node itself is very simple and can be done as a simple struct.
struct Node
{
    int value;
    Node *next = nullptr;
};
Note specifically the asterisk, making next a node pointer. Moreover, this pointer has a default value of nullptr; if a value is not provided to the constructor, it will be set to nullptr.
Linking Nodes#
With the Node struct defined, we can try to create a few nodes and link them as follows
Node a{12};
Node b{57};
Node c{36};

a.next = &b;
b.next = &c;
However, this is not how we want to use our linked list. Instead, we want to build a list class based on the nodes, requiring the definition of a LinkedList class.
Creating a list class based on a linked list#
To interact with the linked list, we need to have a reference to its first node. This node is often referred to as the head of the list. If our list is empty, the head of the list must not point at anything. We can then set up the class as follows
class LinkedList
{
  private:
    Node *head = nullptr;

  public:
    LinkedList()
    {
    }
};
Appending to LinkedList#
Now, let us try to make an append method for adding an element at the end of the list. Let us first consider how to do this for a completely empty list.
For an empty list, the head pointer is pointing at nullptr. We want it to instead point to a new node. To do this, we need to use the new keyword to dynamically allocate memory for a new node. For an empty list it suffices to do
void append(int val)
{
    if (head == nullptr)
    {
        head = new Node{val};
    }
}
However, if there are already elements in the list, we shouldn’t change the head pointer. Indeed, the appending method should add the new element to the end of the list, while the front of the list should not change.
The goal is to get the next pointer of the list’s final node to point to the new node. For that, we first need to get access to the last node. We can do this by iterating through all nodes in the list, using next on each node to move one step further in the list. The first node to point at a nullptr must determine the end of the list. This reasoning can be expressed with a while-loop
void append(int val)
{
    Node *new_node = new Node{val};
    if (head == nullptr)
    {
        head = new_node;
        return;
    }

    Node *current = head;
    // Move node until we are at the last element
    while (current->next != nullptr)
    {
        current = current->next;
    }

    current->next = new_node;
}
The reader is encouraged to review this code, verifying that it works if the list has 0, 1, or more than 1 element before appending. We will briefly add a test to ensure that the program is working as expected, but first, we need to add a method to retrieve elements. Before adding this method, let us discuss one way of making the above code more efficient. At the moment, in order to append an element, the entire list has to be iterated to find its last node. By already having a pointer to the last element, we can append elements directly. It is common to add a pointer called tail, which is similar to head, now pointing at the last element instead of the first one.
Implementing the indexing operator#
We will now implement an indexing operator in order to retrieve elements at specific indices in the list, similar to what we did for ArrayList. One possible version could be the following
int &operator[](int index)
{
    Node *current = head;
    for (int i = 0; i < index; i++)
    {
        current = current->next;
    }
    return current->value;
}
Here we make a Node pointer that starts at head. We then move the pointer to the next pointer the same number of times as the index provided. Let us add a test for this called test_append_and_get which looks as follows
void test_append_and_get()
{
    LinkedList ll{};
    ll.append(0);
    ll.append(1);
    assert(ll[0] == 0);
    assert(ll[1] == 1);
}
This test can be compiled and run, but what happens if we try to access an element outside the bounds of the list?
int main()
{
    LinkedList ll{};
    std::cout << ll[0] << "\n";
    return 0;
}
Compiling and running this gives the following output
$ ./linked_list
[1]    23683 segmentation fault  ./linked_list
We would like to add a clearer error message in this case, saying that the user is trying to access an element outside the bounds of the list. We can modify the operator[] method as follows
int &operator[](int index)
{
    if ((index < 0) || (index >= length()))
    {
        throw std::range_error("Index out of bounds") Node *current = head;
    }
    for (int i = 0; i < index; i++)
    {
        current = current->next;
    }
    return current->value;
}
The first line of this function now checks whether the index is negative or larger than the length of the list, throwing an error in that case. Note that we also need to add the following line at the top of the file
#include <stdexcept>
Now we just need to implement the length() function. For our implementation, we define a method that finds the number of elements by iterating through them.
int length()
{
    Node *current = head;
    int _size = 0;

    while (current != nullptr)
    {
        _size++;
        current = current->next;
    }
    return _size;
}
This works, but as mentioned, it is not efficient to have to iterate through the entire list every time we want to know the number of elements. To improve this and make the length method more efficient, we add a _size field to the class, initializing it to 0 (for an empty list) and updating it manually every time an element is added or removed. By defining a private attribute int _size we can make our length method as
int length()
{
    return _size;
}
Compiling and running the program now gives the following output
$ ./linked_list
libc++abi: terminating with uncaught exception of type std::range_error: Index out of bounds
[1]    23951 abort      ./linked_list
Let us also add a test that ensures that a range_error is thrown when we try to access an element outside of its bounds. This could be implemented as follows
void test_access_element_out_of_bounds_throw_range_error()
{
    LinkedList ll{};

    bool throwed_range_error = false;
    try
    {
        int x = ll[0];
    }
    catch (const std::range_error &e)
    {
        throwed_range_error = true;
    }
    assert(throwed_range_error);
}
Here we first make an empty list named ll. Then we create a bool variable called throwed_range_error, initially set to false. Next, we try to access the first element in the empty list. This should throw a range_error, and if it does, we turn the variable throwed_range_error into a true value. Finally, we assert that the value is true.
Click to see the full source code
#include <cassert>
#include <iostream>
#include <stdexcept>

struct Node
{
    int value;
    Node *next = nullptr;
};

class LinkedList
{
  private:
    Node *head = nullptr;
    int _size = 0;

  public:
    LinkedList()
    {
    }

    void append(int val)
    {
        Node *new_node = new Node{val};
        _size++;
        if (head == nullptr)
        {
            head = new_node;
            return;
        }

        Node *current = head;
        // Move node until we are at the last element
        while (current->next != nullptr)
        {
            current = current->next;
        }
        current->next = new_node;
    }

    int length()
    {
        return _size;
    }

    int &operator[](int index)
    {
        if ((index < 0) || (index >= length()))
        {
            throw std::range_error("Index out of bounds");
        }
        Node *current = head;
        for (int i = 0; i < index; i++)
        {
            current = current->next;
        }
        return current->value;
    }
};

void test_append_and_get()
{
    LinkedList ll{};
    ll.append(0);
    ll.append(1);
    assert(ll[0] == 0);
    assert(ll[1] == 1);
}

void test_access_element_out_of_bounds_throw_range_error()
{
    LinkedList ll{};

    bool throwed_range_error = false;
    try
    {
        int x = ll[0];
    }
    catch (const std::range_error &e)
    {
        throwed_range_error = true;
    }
    assert(throwed_range_error);
}

int main()
{
    test_append_and_get();
    test_access_element_out_of_bounds_throw_range_error();
    return 0;
}
Organizing the code into linked_list.cpp and test_linked_list.cpp#
Similar to the ArrayList class, we would like to keep the test code separate from the implementation of the LinkedList (see Adding tests in a separate test file). To do so, we will implement the class LinkedList in a file called linked_list.cpp and the tests together with the main function in the file test_linked_list.cpp. We then move the function main, test_append_and_get, and test_access_element_out_of_bounds_throw_range_error to the file test_linked_list.cpp, such that linked_list.cpp looks as follows
// linked_list.cpp
#include <stdexcept>

struct Node
{
    int value;
    Node *next = nullptr;
};

class LinkedList
{
  private:
    Node *head = nullptr;
    int _size = 0;

  public:
    LinkedList()
    {
    }

    void append(int val)
    {
        Node *new_node = new Node{val};
        _size++;
        if (head == nullptr)
        {
            head = new_node;
            return;
        }

        Node *current = head;
        // Move node until we are at the last element
        while (current->next != nullptr)
        {
            current = current->next;
        }
        current->next = new_node;
    }

    int length()
    {
        return _size;
    }

    int &operator[](int index)
    {
        if ((index < 0) || (index >= length()))
        {
            throw std::range_error("Index out of bounds");
        }
        Node *current = head;
        for (int i = 0; i < index; i++)
        {
            current = current->next;
        }
        return current->value;
    }
};
Similarly, test_linked_list.cpp looks as follows
#include <cassert>
#include <iostream>

#include "linked_list.cpp"

void test_append_and_get()
{
    LinkedList ll{};
    ll.append(0);
    ll.append(1);
    assert(ll[0] == 0);
    assert(ll[1] == 1);
}

void test_access_element_out_of_bounds_throw_range_error()
{
    LinkedList ll{};

    bool throwed_range_error = false;
    try
    {
        int x = ll[0];
    }
    catch (const std::range_error &e)
    {
        throwed_range_error = true;
    }
    assert(throwed_range_error);
}

int main()
{
    test_append_and_get();
    test_access_element_out_of_bounds_throw_range_error();
    return 0;
}
Note that we also need to include linked_list.cpp inside the test_linked_list.cpp file.
To compile the binary executable, simply compile the file test_linked_list.cpp as below
c++ -std=c++14 test_linked_list.cpp -o linked_list
Refactoring the indexing operator#
When accessing an element at an index, we first check whether the index provided is out of bounds. If that is not the case, we need to find the relevant node and return the value it stores. Checking whether an index is out of bounds and finding a pointer to a node at a given index is often useful in other methods as well. Moreover, we should strive to make methods that do only one thing while the current method does three things. We will make two new private methods; one for checking the bounds and one for getting a node at a given index. These can be implemented as follows
void check_index_out_of_bounds(int index)
{
    if ((index < 0) || (index >= length()))
    {
        throw std::range_error("Index out of bounds");
    }
}

Node *find_node_at_index(int index)
{
    Node *current = head;
    for (int i = 0; i < index; i++)
    {
        current = current->next;
    }
    return current;
}
Furthermore, we update the int operator[] as follows
int &operator[](int index)
{
    check_index_out_of_bounds(index);
    Node *current = find_node_at_index(index);
    return current->value;
}
After these modifications, it is important to recompile and make sure that the tests are still passing.
Destroying the list#
As we are dynamically allocating the nodes with the new keyword, we should also deallocate the nodes when they are no longer useful. Before implementing the destructor, let us first verify that we indeed have a memory leak. One method is to use a tool to check the memory use on execution, such as Valgrind (see also debugging section), available on Unix systems. For Windows, there is, for example, the Visual Leak detector made for Visual C++. It is also available on IFI machines.
After installing Valgrind, one can run the following to analyze an executable and see if it seems reasonable
valgrind-- tool = memcheck<your executable>
Running the tests for the linked_list using Valgrind now gives us the following output
$ valgrind --tool=memcheck ./linked_list
==1993315== Memcheck, a memory error detector
==1993315== Copyright (C) 2002-2017, and GNU GPL'd, by Julian Seward et al.
==1993315== Using Valgrind-3.18.1 and LibVEX; rerun with -h for copyright info
==1993315== Command: ./linked_list
==1993315==
==1993315==
==1993315== HEAP SUMMARY:
==1993315==     in use at exit: 32 bytes in 2 blocks
==1993315==   total heap usage: 5 allocs, 3 frees, 72,924 bytes allocated
==1993315==
==1993315== LEAK SUMMARY:
==1993315==    definitely lost: 16 bytes in 1 blocks
==1993315==    indirectly lost: 16 bytes in 1 blocks
==1993315==      possibly lost: 0 bytes in 0 blocks
==1993315==    still reachable: 0 bytes in 0 blocks
==1993315==         suppressed: 0 bytes in 0 blocks
==1993315== Rerun with --leak-check=full to see details of leaked memory
==1993315==
==1993315== For lists of detected and suppressed errors, rerun with: -s
==1993315== ERROR SUMMARY: 0 errors from 0 contexts (suppressed: 0 from 0)
In this case, we get information that some memory is leaked.
This is because when the program is finished, it starts deallocating and destroying variables. When the primes list is deleted, the dynamically allocated nodes are not (because we ran this before implementing the destructor method). As a consequence, we have “16 bytes in 1 blocks” marked as “definitely lost,” which correspond to the head node. In addition, we have “indirectly lost” 16 bytes in 1 block from the other node in the append test. This other node gets lost as a consequence of us needing the head pointer to get to it (hence the indirect loss).
Let us add a destructor method to the class. This method should go through the list, deallocating each node one by one. When we destroy a node, the access to its .next attribute is lost, so the reference should be copied to a temporary object before the node’s deletion.
~LinkedList()
{
    Node *current = head;
    Node *next = nullptr;

    while (current != nullptr)
    {
        next = current->next;
        delete current;
        current = next;
    }
}
This seems reasonable: we have used one new for each node in the list, and this while-loop should have a delete for each node, meaning no memory should be leaked. Nonetheless, as is always wise in programming, we should plan for mistakes and human error. So after implementing the destructor ~LinkedList method, we rerun the memory leak analysis and get
$ valgrind --tool=memcheck ./linked_list
==1993385== Memcheck, a memory error detector
==1993385== Copyright (C) 2002-2017, and GNU GPL'd, by Julian Seward et al.
==1993385== Using Valgrind-3.18.1 and LibVEX; rerun with -h for copyright info
==1993385== Command: ./linked_list
==1993385==
==1993385==
==1993385== HEAP SUMMARY:
==1993385==     in use at exit: 0 bytes in 0 blocks
==1993385==   total heap usage: 5 allocs, 5 frees, 72,924 bytes allocated
==1993385==
==1993385== All heap blocks were freed -- no leaks are possible
==1993385==
==1993385== For lists of detected and suppressed errors, rerun with: -s
==1993385== ERROR SUMMARY: 0 errors from 0 contexts (suppressed: 0 from 0)
This tells us that all used memory was also freed at the end of execution, meaning no leaks exist in this test case. Note that there is no guarantee that there will be no leaks in other use cases of the list. The above analysis only ensures no leakage in the simple test that supported our implementation.
Overloading the constructor to take a list of elements#
Let us now implement a new constructor that can take a list of elements through a vector<int> and that uses the append method to add elements to the list
LinkedList(std::vector<int> values)
{
    for (int v : values)
    {
        append(v);
    }
}
Note that the following line should be added at the top of the file
#include <vector>
Let us also add a test to make sure that the constructor is working as expected.
void test_vector_constructor()
{
    LinkedList ll{{0, 1}};
    assert(ll[0] == 0);
    assert(ll[1] == 1);
}
Printing a linked list#
Now, let us add a print method to print out the list’s contents. To do this, we need to iterate through the list, printing out the value of each node until we reach the end of the list.
void print()
{
    std::cout << "[";
    if (head != nullptr)
    {
        Node *current = head;
        while (current->next != nullptr)
        {
            std::cout << current->value;
            std::cout << ", ";
            current = current->next;
        }
        std::cout << current->value;
    }
    std::cout << "]\n";
}
Let us also add a test to make sure that we can print an empty list as well as a list with one element
void test_print()
{
    LinkedList ll{};
    ll.print();
    ll.append(0);
    ll.print();
}
The output when running this test should be
$ ./linked_list
[]
[0]
Iterating over the Linked List#
So far, we have iterated over the linked list a few times using the next of each node to take the next step inside a while-loop.
Node *current = head;
while (current != nullptr)
{
    current = current->next;
}
Outside the loop, however, we cannot iterate in the same way because we have set head to be private. This was done for a good reason: we do not want a user to have to think about the structure of the linked list and its implementation details. If the user had access to head or had to use the nodes directly, the structure would neither elegant nor foolproof.
Given a list called example and remembering we have just implemented indexing, one might think we can iterate through the list in the following way
for (int i = 0; i < example.size(); i++)
{
    example[i];
}
This is far from perfect. Recall that in order to index element \(i\), our get-operation implementation forces us to iterate over all elements preceding example[i]. In addition, in our for-loop, we first refer to element 0, then element 1, then element 2, and so on. Every time we iterate over a new element, the get-operator will start iterating all over again.
To get around this, we would like to implement the class in such a fashion that we can write, for a given list primes
for (int p : primes)
{
    std::cout << p << std::endl;
}
In other words, we want to be able to use the same syntax as in the vector class. To get this functionality, we have to create a custom iterator for the LinkedList class, and this iterator would keep track of the last visited node. The process would then be made effective by just using next to iterate one element. Unfortunately, we have not covered iterators, and making them is demanding enough that we will not take the time to do it here.
Inserting to the front of the list#
Sometimes, we might not want to insert elements at the end of the list. Instead of wanting to “append” an element to a list, we might want to “prepend” or insert it at the front. For our linked list example, this is, in fact, very simple! It suffices to make the new element the head and then point from the newly created node to the previous head. We know that Node can take the newly added value as the first argument and the pointer to the next node as the second argument, so this is manageable in a single line.
void push_front(int val)
{
    head = new Node{val, head};
    _size++;
}
Let us add a small test to make sure it works as expected
void test_push_front()
{
    LinkedList ll{{1, 2, 3}};
    ll.push_front(42);
    assert(ll.length() == 4);
    assert(ll[0] == 42);
}
Inserting to the middle of the list#
What if we instead want to insert new elements into the middle of the list, namely at a specific index \(i\)? In this scenario, we need node \(i-1\) to point to the new node and this new node to point at the node that was previously node \(i\).
When performing these steps, we do not want to use find_node_at_index more than once, as it becomes significantly inefficient. To avoid that, let us do as follows
void insert(int val, int index)
{
    Node *prev = find_node_at_index(index - 1);
    Node *next = prev->next;
    prev->next = new Node(val, next);
    _size++;
}
It is left as an exercise for the reader to test the previous implementation for the important edge case in which we try to insert a new element as the last node of the list.
Different inserts#
For the purpose of clarification, let us compare the different insert methods: append, push_front, and insert. First, the insert method inserts a new element at any index in the list. If we do insert at index 0, this is the same as using push_front. Conversely, if we insert it at the end of the list, i.e., index \(N\) for a list with \(N\) elements, we are effectively appending an element.
We draw the three situations below. If these concepts are still unclear, the reader is encouraged to draw up a linked list and then try to insert elements by drawing new nodes and moving pointers around.
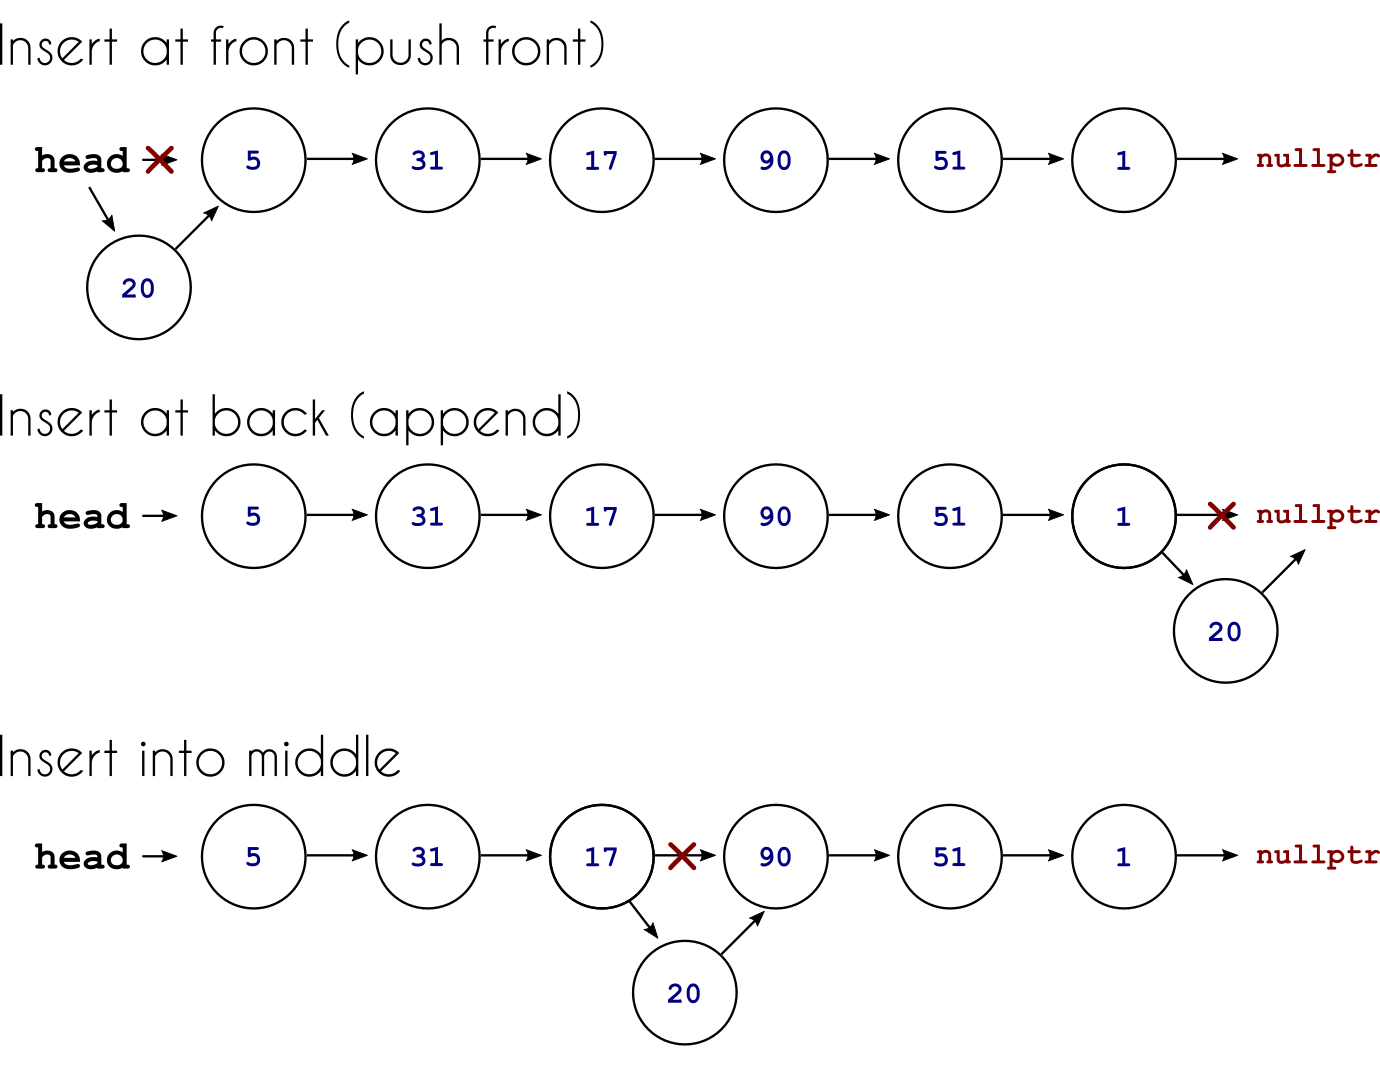
Fig. 34 Different ways of inserting elements into the linked list.#
Click to see the full source code
// linked_list.cpp
#include <iostream>
#include <stdexcept>
#include <vector>

struct Node
{
    // The value at the node
    int value;
    // Pointer to the next node
    Node *next = nullptr;
};

class LinkedList
{
  private:
    // Pointer to the first element in the list
    Node *head = nullptr;
    // Size of the list
    int _size = 0;

    /**
     * @brief Check whether the given index if out of
     * bound and throw a range error if it is
     *
     * @param index The index to be checked
     */
    void check_index_out_of_bounds(int index)
    {
        if ((index < 0) || (index >= length()))
        {
            throw std::range_error("Index out of bounds");
        }
    }

    /**
     * @brief Find the node at the given index
     *
     * @param index The index where you want the node
     * @return Node* A pointer to the node at the index
     */
    Node *find_node_at_index(int index)
    {
        Node *current = head;
        for (int i = 0; i < index; i++)
        {
            current = current->next;
        }
        return current;
    }

  public:
    // Default constructor
    LinkedList()
    {
    }

    // Constructor for a list of values
    LinkedList(std::vector<int> values)
    {
        for (int v : values)
        {
            append(v);
        }
    }

    // Destructor
    ~LinkedList()
    {
        Node *current = head;
        Node *next = nullptr;
        // Move node until we are at the last element
        while (current != nullptr)
        {
            next = current->next;
            delete current;
            current = next;
        }
    }

    /**
     * @brief Print values in the list
     *
     */
    void print()
    {
        std::cout << "[";
        if (head != nullptr)
        {
            Node *current = head;
            while (current->next != nullptr)
            {
                std::cout << current->value;
                std::cout << ", ";
                current = current->next;
            }
            std::cout << current->value;
        }
        std::cout << "]\n";
    }

    /**
     * @brief Append element to the end of the list
     *
     * @param val The value to be appended
     */
    void append(int val)
    {
        Node *new_node = new Node{val};
        _size++;
        if (head == nullptr)
        {
            head = new_node;
            return;
        }

        Node *current = head;
        // Move node until we are at the last element
        while (current->next != nullptr)
        {
            current = current->next;
        }

        current->next = new_node;
    }

    /**
     * @brief Return the length of the list
     *
     * @return int The length
     */
    int length()
    {
        return _size;
    }

    /**
     * @brief Get value at a given index
     *
     * @param index The index
     * @return int& Reference to the value at that index
     */
    int &operator[](int index)
    {
        check_index_out_of_bounds(index);
        Node *current = find_node_at_index(index);
        return current->value;
    }

    /**
     * @brief Add element to the beginning of the list
     *
     * @param val The value to be added
     */
    void push_front(int val)
    {
        head = new Node{val, head};
        _size++;
    }
};

// test_linked_list.cpp
#include <cassert>
#include <iostream>

#include "linked_list.cpp"

/**
 * @brief Test the append method and the indexing operator method
 *
 */
void test_append_and_get()
{
    LinkedList ll{};
    ll.append(0);
    ll.append(1);
    assert(ll[0] == 0);
    assert(ll[1] == 1);
}

/**
 * @brief Test that accessing an element outside of the
 * bounds throws a range error.
 *
 */
void test_access_element_out_of_bounds_throw_range_error()
{
    LinkedList ll{};

    bool throwed_range_error = false;
    try
    {
        int x = ll[0];
    }
    catch (const std::range_error &e)
    {
        throwed_range_error = true;
    }
    assert(throwed_range_error);
}

/**
 * @brief Test that we can construct a LinkedList
 * from a vector of integers
 *
 */
void test_vector_constructor()
{
    LinkedList ll{{0, 1}};
    assert(ll[0] == 0);
    assert(ll[1] == 1);
}

/**
 * @brief Test that printing works
 *
 */
void test_print()
{
    LinkedList ll{};
    ll.print();
    ll.append(0);
    ll.print();
}

/**
 * @brief Test that we can insert element at the front
 *
 */
void test_push_front()
{
    LinkedList ll{{1, 2, 3}};
    ll.push_front(42);
    assert(ll.length() == 4);
    assert(ll[0] == 42);
}

int main()
{
    test_append_and_get();
    test_access_element_out_of_bounds_throw_range_error();
    test_vector_constructor();
    test_print();
    test_push_front();
    return 0;
}
Linked List Variants#
The linked list data structure we have created so far is only the very simplest kind of a linked list. We call it a singly linked list because each node connects to the next one with a single link. It is also possible to create doubly linked lists, where each node has a next pointer but also a previous pointer. In this case, we can iterate the list in either direction. Similarly, there are circularly linked lists, where we connect the final node to the first node again. For even more examples, take a look at this Linked List article.
We will come back to some of these variants to understand how they differ from our implementation in Comparing Linked Lists and Dynamic Arrays.
Comparing Dynamic Arrays and Linked List#
We have taken some time to look at linked lists in detail and also Dynamic Arrays. As we have seen, both can be used to implement the list abstract data type. Now, we want to take a step back and look at how the choice in the underlying data structure affects the performance of the final list object.
However, before this, we need to learn more about algorithm analysis, which is the topic of the next chapter, Algorithm Analysis of Big O notation. After that, we will return to comparing data structures in Comparing Linked Lists and Dynamic Arrays.