Version Control with Git#
In this chapter, we will cover version control with Git. We shall cover what Git is and simple examples of use. The accompanying exercises will require the reader to use Git to track and store their code.
References#
Git, like most aspects of programming, is best learned by doing. Our current approach will be to learn the basics Git and GitHub by using it for assignments and hand-ins. In this chapter, we cover the basics, and as the course goes on, we will learn more and become more proficient.
It is important to mention that there are a lot of resources for learning Git online. Therefore, for readers who decide to have a different introduction than the one contained herein, some external material will be listed here.
Perhaps the best and simplest resource available is the GitHub guides. In this guide, there is a Git Handbook containing a reference to all the basic Git commands as well as links to more resources. The Understanding the GitHub flow section is a short but great read to learn the basic concepts about how developers use GitHub in their workflow. Finally, there is a simple Hello world project that we recommend all readers check out, especially the ones with no previous contact with Git or GitHub.
Another very good resource is from one of GitHub’s competitors, Atlassian. For a more interactive tool, there is also the Learn Git branching material. If the aim is for more in-depth coverage or more extensive reference work, the book Pro Git by Scott Chacon and Ben Straub is released under a Creative Commons BY-NC-SA3.0 license, meaning it can be downloaded for free. The second edition was released in 2014 and can be downloaded download as a pdf or other common e-book formats under the linked website. The book itself is very extensive, being over 500 pages. It starts off fairly easy, going into more technical details towards the end, so reading the first few chapters can still be a good introduction to Git.

Fig. 10 Pro Git Book website: https://git-scm.com/book/en/v2#
Another excellent alternative is the book Version Control by Example, which also touches upon the history of version control and other version control systems other than Git.
Again, these resources are simply offered as an alternative or in addition to the current material.
Why version control?#
Imagine having a new software assignment with a specific deadline. After getting the code to work as intended, it is often necessary to do some code refactoring and final changes, usually as a last step of the project (but even periodically for long-term projects). Suppose that in this refactoring process, the code suddenly stops working. It can be difficult to identify the bug, especially when several parts of the code were changed at once. It is never ideal, in situations like these, to simply start the project again or even spend large amounts of time nitpicking every last change. This is just one case where version control would be useful, giving the option to “go back in time” in code in a precise manner.
We will first discuss version control systems (VCS) and Git, a tool to automate version control. Simply put, VCS is a crucial tool for any software developer, and the bigger the project one is working on, the more crucial it is.
The main idea of VCS is very simple: we make regular “backups” of the code at different times, enabling us to see how it looked earlier or, in extreme cases, revert the whole codebase to a previous stage. There are many tools for automatic machine backup, and many tools have it built in. Dropbox, for example, has built-in file checkpoints, which can sometimes be very helpful. The tools we will discuss, however, are specially built for software development instead of simple file sharing.
Benefits of version control#
Some benefits of version control are
Backup of files in case of computer crashes
Make it easier to see which changes introduced an error
Lets the user undo bad changes and revert to working copies
Great for collaboration and lets several people contribute to the same project
Allows for branching of code, testing new ideas, or making different versions of the code
Accountability: version control tracks who did what in the code
Different version control systems#
A VCS is any framework that allows keeping track of a project over time and stores revisions. The simplest form is a local one, where the entire file history is stored locally on the user’s computer or network.

Fig. 11 A local VCS. Source: Chacon & Straub, ProGit (2014)#
There are two problems with using a local VCS. The first is that there is no backup in case of a computer crash or failure. In addition, most programmers do not work on projects by themselves but often need to pass code back and forth or have the option of several programmers working on the code simultaneously. A local VCS does not handle such collaboration too well.
One way to deal with these challenges is to use a centralized server to keep track of the version history. Different users can read out specific versions of files, work on the code and upload their changes to the server. This makes collaboration between programmers easy. Admins and team leaders can also monitor the server and give people the right to alter the code they are working on. It also has the benefit that if any person’s laptop or computer crashes, it impacts only the last not yet uploaded changes instead of the whole system. However, the central server is still a single point of failure and should be properly backed up. Furthermore, if the server is down due to maintenance or issues, working becomes hard for the team, and efficiency drops.
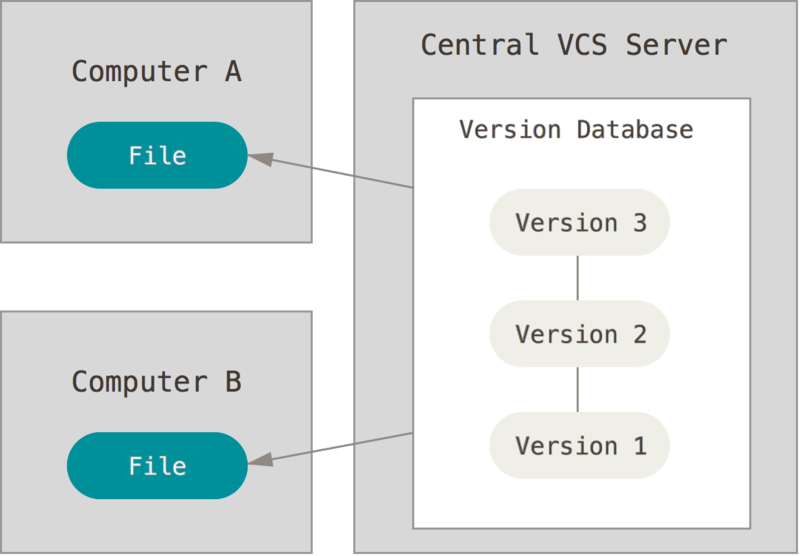
Fig. 12 A centralized VCS. Source: Chacon & Straub, ProGit (2014)#
The kind of VCS we will be using is called a distributed VCS. Like the centralized system, we will also interact with an external server for backups and collaboration. The difference is that with the distributed VCS, every user stores a complete copy of the entire project history. This gives additional safety, as every user has a complete backup. It also gives efficiency, as users can access the whole project history, even offline, and only have to push or pull the changes in code. The only downside is the use of space, as it stores the same information in multiple places. Since most software projects take little space, this is of little issue.
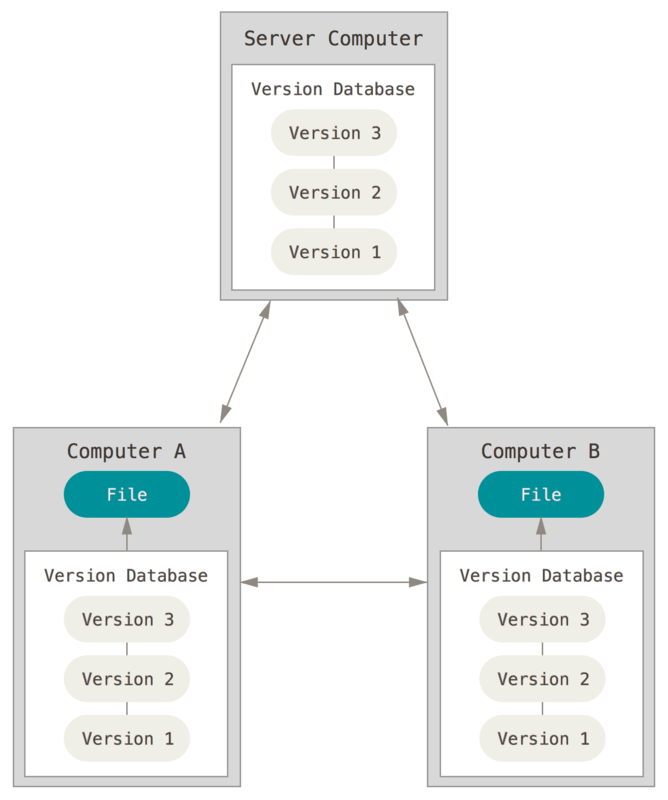
Fig. 13 A distributed VCS. Source: Chacon & Straub, ProGit (2014)#
Enter: Git#
There are many different version control softwares to choose from today. The one we will be using is called Git, chosen by its high popularity in open-source development and scientific programming and because it is open-source and free. When working on a real-world project, however, all collaborators should use the same VCS. Other common VCSs, such as Mercurial and Bazaar, are also very similar to Git, so by knowing Git, one will most likely be able to migrate VCSs with little issue.
Where does Git come from? It was created by Linus Torvalds in 2005 for the development of the Linux kernel. Until then, the Linux development team had been using a proprietary software called BitKeeper, but there was a falling out. As a result, Linus decided to develop his own software to take its place (this is, of course, a big simplification of the story).
One reason Git grew in popularity so fast was because of its unprecedented speed. Even when working on huge projects (like the Linux kernel), it is so fast that the user rarely has to wait for it at all.
Git commits#
When using Git, the work and editing of files can be done as usual. At regular intervals, however, the user should perform commits, which are “snapshots” of the user’s local project files to be stored in the project’s history. Over time the user contribution is resumed to a long chain of these commits, but when looking at a project through a normal file tracker or text editor, only the current local version of the software can be seen. To store the history, Git creates a hidden .git-directory. This hidden directory and all its files should be ignored and never accessed or edited manually, as this will mostly break the version control. In order to look at or access older commits, some simple Git commands should be performed instead.
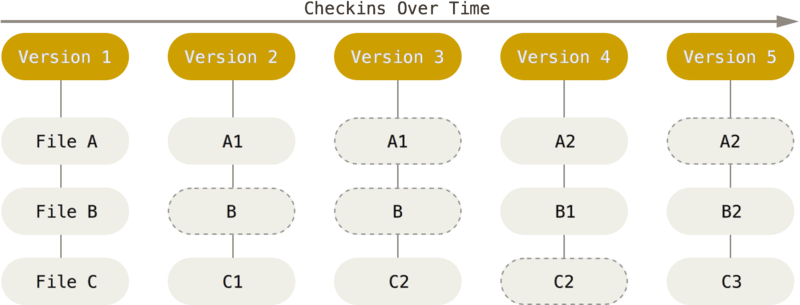
Fig. 14 Source: Chacon & Straub, ProGit (2014)#
The entire project, including the project history stored in the .git folder, is referred to as a repository. Typically, we create a new repository for each new software project.
A commit usually includes all changes to the local project files since the user’s last commit, namely edits, creations, and deletions of files. Despite this, older commits will still contain a file that was deleted from the project’s current version. Thus, when making new commits, we only ever add things to our project; we never remove them. What happens in Git stays in Git. In addition, each commit is named after a hash of the complete project history thus far, making the project history tamper-proof. If someone changes the project’s history, the hashes will no longer match.
In this sense, Git resembles a blockchain. Indeed, both Git and blockchain use the concept of Merkle trees, but strictly speaking, Git does not use blockchain technology. An informative discussion about this comparison can be read on this Stack Overflow thread.
Installing and setting up Git#
Please consult the setup instructions for information about how to set up Git correctly.
After installing Git, the user needs to configure it by adding a name and email. This will serve as identification so that changes to any repositories can be labeled by who the modifier was. This setup can be done by writing the following commands to the terminal
git config --global user.name "John Doe"
git config --global user.email johndoe@example.com
These two simple commands are all that is required to start using Git! For additional configuration options, check out the first-time Git setup guide.
Choosing a remote server#
Git is a piece of software installed on a computer and used through the terminal, so one can use it solely on the local machine if that is desired. However, a major benefit of Git is that it is a distributed VCS, so to use its full potential, we want to copy the local project repository over to an external server as well. For that, there are many third-party services to choose from, the three major ones being GitHub, Bitbucket, and GitLab. All of them provide free accounts and paid accounts with more functionality. They also provide benefits for students, so signing in with a student email is recommended.
For this course, we will use UiO’s own GitHub server, https://github.uio.no, which will behave and look like the official GitHub server . Creating a user for the UiO GitHub is unnecessary, as the login can be done with the student’s UiO username and password.
If the reader wants to create a user on github.com, they are welcome to do so, even though the project work will be carried out and handed in via github.uio.no. A point of attention is that some GitHub functionalities are not yet available on UiO’s own GitHub server.
Getting a repository#
Thus far, we have shown how to install Git and set up a user, but we need to get our hands on a Git repository to explore. For that, there are two alternatives: either we create a brand new one or copy an existing one.
To copy an existing repository, we first need to find one, such as the IN1910 repository. This repository can then be copied to the local machine using the git clone command and adding the repository’s URL.
git clone https://github.uio.no/IN1910/IN1910_H23
This is made easier by using the “Clone” button on any repository website. Once this is done, a local copy of the entire repository is created on the local machine. This cloning process is one way to download the course material, although we recommend just using the GitHub pages directly.
Since this cloned repository is just a local copy of someone else’s, when the original owner makes a new change to the online repository, the changes do not propagate automatically to the local repository. However, these changes can be pulled to the local copy by doing a git pull command. For the IN1910 repository, this means that as lecture notes and assignments are added or modified, the changes can be pulled down to the local machine with a simple command.
Creating a new repository#
To better learn Git, using someone else’s repository is not enough. We should also create a new repository from scratch, either locally or through GitHub.
Creating a repository locally#
To create a new repository locally, we first create a new folder for the project, navigate to it in a terminal, and then run the command git init. The name of this repository will therefore be the name of the folder. As an example, suppose we want a repository to track solutions of exercises from the website projecteuler.net. In this case, we call our project euler, and it can be done as follows
mkdir euler
cd euler
git init
Note that we are creating an empty repository because the file is empty. If we instead used git init from a folder containing previously written code, the repository would start with this project’s code already.
Do not use git init inside the Desktop or Documents folder!
Using git init in the wrong location can cause unintended changes or loss of data. In particular, using it in the Desktop or Documents folder can lead to accidentally committing or pushing files that were not meant to be version-controlled. This could result in the loss of important data or personal information.
Creating a repository through GitHub#
An alternative is to make a repository through GitHub. In this case, one can simply click the + sign on GitHub’s main page and choose “New Repository”, after which the page gets redirected to one like the following
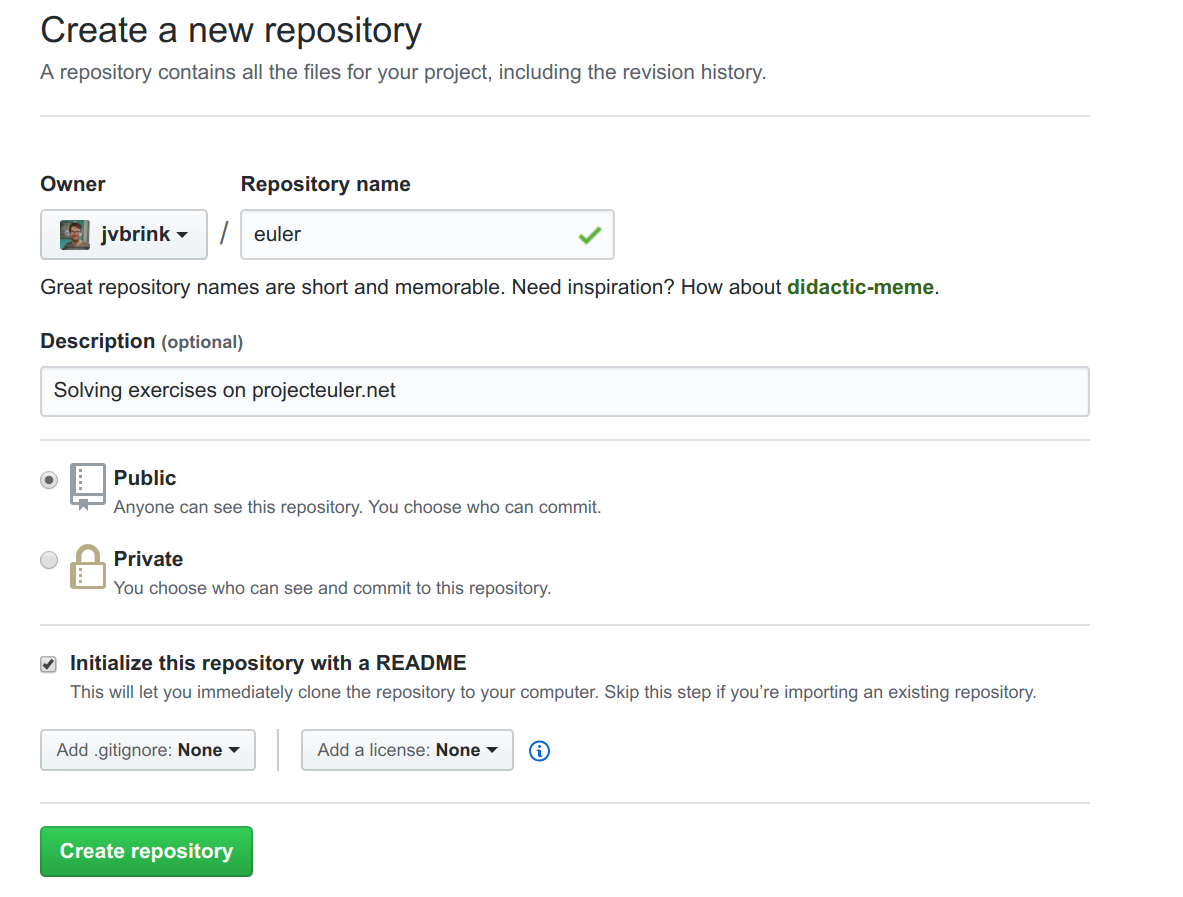
Fig. 15 Creating a repository at GitHub#
Here a name and an optional short description of the project should be provided. We can choose to make this repository public, in which case it can be accessed by everyone online (or everyone with a UiO user for github.uio.no), or private, in case only the people we explicitly give access to can see it. To get more out of the regular GitHub account, students can also apply for a student develop pack.
Finally, we can add a README, a .gitignore, and a license. For now, we only want the README, as it makes things practical, while the .gitignore will be addressed later. We also leave the license blank.
Once the repository has been structured on GitHub, we can clone it down to the local machine via
git clone https://github.com/<user_name>/euler
In this case, Git will make a folder called euler which we can access.
Adding files to a project#
We now have a local folder called euler which can be treated as a normal folder on the computer, meaning files can be moved or created into it. We could, for example, add a file called problem1.py to solve the first Project Euler problem.
When we want to include new files into a project history through a commit, we first have to add them, also known as “staging” the files or changes. When a commit command is performed, all staged changes are added to the project history.
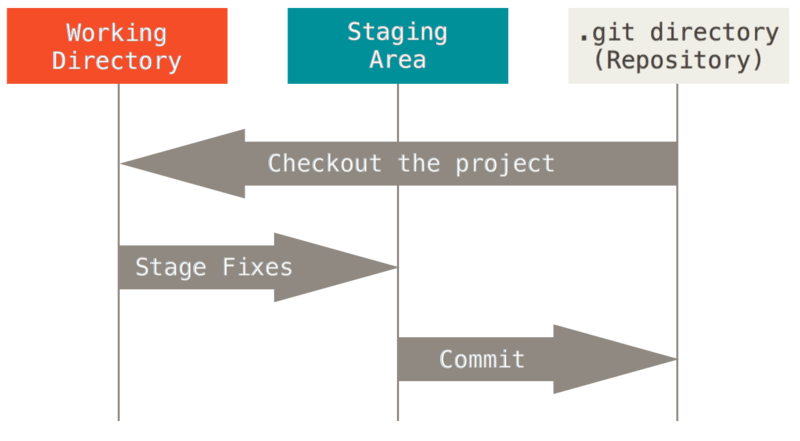
Fig. 16 Source: Chacon & Straub, ProGit (2014)#
We can at any time check the current status of the Git repository by running
git status
which now tells us
On branch main
Your branch is up to date with 'origin/main'.

Untracked files:
  (use "git add <file>..." to include in what will be committed)

	problem1.py

nothing added to commit but untracked files present (use "git add" to track)
The first lines tell us there is nothing on the GitHub repository that has been added after we cloned the repository (this will not be displayed if there is only a local repository but not a remote repository yet). Next, it tells us that there is an untracked file, namely the new file we created.
The git status command is a very convenient one and should be used often. Using it frequently ensures that we are working on the changes we think we are. It also helps avoid conflicts by revealing unmerged and unstaged changes and finally guarantees we maintain a clean repository by showing untracked files. Untracked files are files in the current working directory which Git is not yet aware of, either because they are not part of the repository or because we have not specified that they should be tracked. We tell Git to start tracking files via the git add command, and until this is done, the files will not be added to any commits.
Therefore, to commit our new solution, we first have to add it via
git add problem1.py
or simply
git add .
This last command adds everything in the folder and sub-folders which has been modified and saved instead of adding file by file. Doing this is very practical but requires attention: by using git add ., we could be storing undesired files in the project’s history (for example, files that should only be stored locally and do not need backups). The solution is to create a file called .gitignore in the project folder. This file contains a list of files that should not be added to Git. Ignore files can be autogenerated via websites such as gitignore.io, adapting the file based on the user’s system and used programs. When starting a new repository, it is helpful to take the 30 seconds it takes to make a proper gitignore file. In order for the file to be user-specific, one should feed gitignore.io some useful information, such as the used operating system, text editor, and the project’s programming languages. This will keep the repo looking presentable and without user-specific files, which is of special importance for public repositories.
To create a gitignore file, simply create a file called .gitignore (exactly that), go to the website gitignore.io, and fill in information about OS, text editor, Jupyter notebook, and Python. The output given by the website should then be copied into the newly created file and saved. The file should also then be staged by doing git add .gitignore.
If we only want to add changes made to previously created files, we can use the command git add -u .. In contrast, git add . will add all changes, including created files, unless specified otherwise by the .gitignore file.
Making a commit#
To make a commit, we use the command git commit. This command will open a text editor asking for a commit message, which is a short text, usually a sentence, describing the performed changes since the last commit. All commits should have commit messages allowing others (including the user in the future) to track changes to the project over time. A large software project will usually grow to thousands of commits, so gradual explanations can really help project organization and make it easier to trace moments where bugs were introduced.
Instead of inserting a commit message via Git editor, a commit message can also be written straight into the commit command using the -m flag, as below
git commit -m "Solved problem 1 using Python."
After this, we have stored a snapshot of the project.
A note on adding and editing files#
All newly created files will need to be added using git add. However, most of the time, we are simply editing existing files. We can, for example, go in and change our problem1.py slightly. Edits to files will also show up in git status, but let us illustrate how the status changes with the addition of a problem2.py file. In this case, the status command gives the following (and some additional information removed for readability)
Changes not staged for commit:
	modified:   problem1.py

Untracked files:
	problem2.py
To stage both the changes and the new file, we can use git add ..
git add .
git commit -m "Solved problem 2 using Python."
This commit has now added problem2.py and the changes to problem1.py simultaneously.
git commit -am#
If we only want to include changes to existing files and have not made any new files, we can use the -a flag to the commit. That way, we do not have to keep running the add command for every commit; we only do it when we are actually adding new files. A typical commit command can then look like
git commit -am "Added support for reading .png images to the scan module."
We have now made a repository and made two commits to it. We can also get a report of the commits in a chain by using the command
git log
One example of output for the above command can be seen below.
commit 08b79fde10ad4ad7aed89881aa44275c175af509 (HEAD -> main)
Author: jvbrink <jonasvdbrink@gmail.com>
Date:   Thu Aug 9 12:04:38 2018 +0200

    Solved problem 2 with Python

commit 3fd2c980dfe696a8f42bc414e260721e11a7f48e
Author: jvbrink <jonasvdbrink@gmail.com>
Date:   Thu Aug 9 11:52:42 2018 +0200

    Solved problem 1 using Python

commit 0c2dd72daaa5aa3496a036611d52b57193e83f3a (origin/main, origin/HEAD)
Author: Jonas van den Brink <jvbrink@users.noreply.github.com>
Date:   Thu Aug 9 11:17:56 2018 +0200

    Initial commit
The most recent commit comes first, followed by older ones below it. The time of the commit and the commit author is also given, and each commit is named by its hash. Note that the log above contains something called HEAD, which is a reference to a commit object. More specifically, it points to the latest commit in the current branch. Despite that, the origin/HEAD is still at our initial commit because our changes so far have only been local, and origin is the name of the copy of the repository on GitHub. Let us see how to change this.
Pro tip: Committing only a part of a file
Sometimes there are multiple changes to a file, with different changes belonging to different commits. It is possible to add only part of the file to the staging area by using git add -p. This will open an interactive window showing the git diff of a section with a question (1/2) Stage this hunk [y,n,q,a,d,j,J,g,/,e,?]?. In this example, there are two sections (or hunks), and we decide if we stage or not the first one by typing y or n respectively. It is also possible to type ? to see more info.
Similarly, it is possible to discard changes to only parts of a file via git restore -p <filename>, but more on that later.
Interacting with GitHub#
We now start interacting between the local repository and GitHub. The server (be it GitHub or something else) is called the origin in Git-lingo. References to origin are often seen and might have already been encountered in the git status messages.
The next steps require our local repo to be linked to GitHub. This is already the case if the local repo was created by cloning the website’s version of it. However, if the repository was created locally using git init, this coupling has to be done manually. First, the GitHub repository needs to be created, as normal, but without a README, gitignore, or license files.
Subsequently, running the following commands will couple both repositories
git remote add origin <URL>
Where <URL> is the URL of the remote repository we want to connect to. One can also verify the new remote URL using
git remote -v
Here, -v stands for “verbose”, and the above command then outputs
origin  <URL> (fetch)
origin  <URL> (push)
The above output means that the remote, named origin, is currently added to the local repository, with both fetch and push URLs set to <URL>.
Finally, we push all the changes made in the local repository to the remote repository using the following command
git push origin main
Whether to start new repositories on the website, then clone them down, or start locally and set the origin manually is just a matter of preference. Nonetheless, most people prefer the former rather than the latter.
Pushing and Pulling#
The two main commands to interact between the local copy of the repository and the online one are push and pull. Here push means copying commits made locally up to the origin, while pull means copying commits that have been pushed to the online repo down to the local machine.
By following the previous Git commands, and unless the reader has already pushed commits, the git status command for the euler project now should return
Your branch is ahead of 'origin/main' by 2 commits.
This message tells us our local repository is two commits ahead of the version on GitHub. To remedy this, we push our latest changes via the command
git push
At this point, the user might be prompted to supply a username and password. This ensures no one else can push content to the repository, but it can also become repetitive. In order to avoid constant authentication requirements, it is possible to cache GitHub credentials in Git or to set up SSH authentication.
In the above example, we could directly use git push because we were at main. However, this does not work for new branches, as they do not have what is called a remote-tracking branch yet. To set such a tracking, one can perform the first push as
git push -u <remote> <branch>
where -u is short for --set-upstream. As mentioned, the convention is to have remote named origin. After this is done for the first time, one can simply use git push normally without additional arguments.
Pushing is paramount because it is what ensures there is an external backup of the project. Solely doing commits that are not followed by pushes does not prevent the work from being lost in case of compromise to the computer. On the other hand, commits and pushes of the project modifications guarantee a backup that can be cloned to a different machine. In addition, when sharing code, other developers will only be able to check local changes once they are pushed. Because of these two factors, frequent pushing is encouraged, although not necessary for every single commit. A good habit is to push code at least at the end of every coding session.
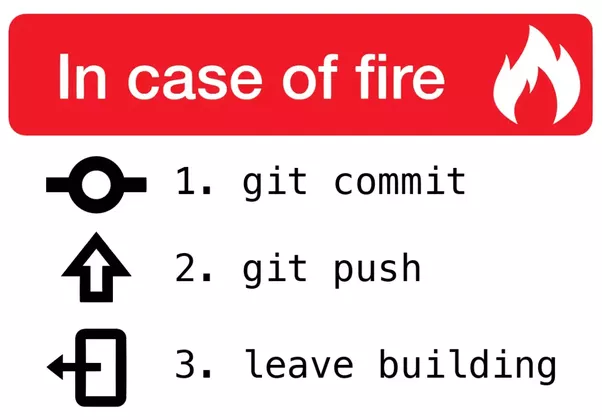
Fig. 17 A common joke in the Git world. Getting the work to safety requires first a commit to store the last local changes, and then a push to get the newest commits to the external sever.#
Pulling when working alone on software is not used as much as when working with others. Indeed, its purpose is to copy changes others have contributed to a repository down to the local machine. Suppose that, while in a project, a collaborator has pushed a new piece of code we want to work on. In order to get these changes to our local version of the repository, we do a git pull
git pull
Pro tip: Pull = Fetch + Merge
In the above example, executing the command git pull (or git pull origin main) will first fetch (download) the collaborator contributions from GitHub and then merge them into the branch we are working on. In other words, git pull origin main consists of first executing the command git fetch origin main and then git merge origin/main. If only a visualization of the partner’s changes is desired, that can be done without the merging step via git fetch (or git fetch origin main).
How to test pushing and pulling#
We will go more in detail on collaborating through Git at a later time, but for now, we show an easy example of collaboration between two people in a project. For this part, it is useful to test the following steps with a colleague. The best way to learn how to collaborate in Git is to find a partner and try it out!
After one person has created the previously mentioned euler repository and set it up to Github, the next step is for the second person to clone the repository by doing
mkdir git_collab_example
cd git_collab_example
git clone https://github.com/user_name/euler
We now have three copies of the same repository: the ones on each person’s machine plus the remote one. These two local copies do not know the other one exists, and so making changes and commits to one of the repositories will not affect or show up in the other one. Still, doing git push with the changes in one repository followed by a git pull in the other will bring them both up to date. This is because the push command sends the changes to the GitHub server, and the pull command pulls down the new changes to the other repository.
Git Forking#
So far, we have seen how to clone a repository from GitHub. This generates a local copy of it and can be done with any public repository on GitHub, Bitbucket, and similar pages. For most open-source code projects, for example, one can clone their repo and instantly have access to the source code and documentation. In fact, many open-source code projects share their code this way, requiring first a repository clone and then a build or installation of the software through some additional steps.
When cloning somebody else’s repository, local changes can be made to it, but those changes cannot be pushed back to their online repository. Indeed, it would not be reasonable to share code openly and in an unsupervised way: in this case, anybody could start messing with the whole project. What should instead be done is something called a fork. Forking consists of linking this local repository to a new public repository different from the cloned one and which we own. If we find some openly available software project we want to build on or modify in some way, we just make a personal fork of it. GitHub makes it very easy to fork any repository. When logged in and looking at a repository, there is a “Fork” button, which automatically creates a new repository, now under our user and which can be cloned down to the local machine.

Fig. 18 Forking projects to build on, extend or modifying existing code#
Git Branching#
Another crucial feature of Git, at least for large projects, is that code can be organized into branches. A branch is exactly what the name implies: a diverging version of the code. We can make branches for several reasons
For testing purposes
Supporting different versions of the same code at the time
For developing new features without disrupting the main code
Doing things that might break the code
Bug fixing
To make a new branch, simply run the command
git branch <new_branch_name>
Suppose we make one branch called testing. The situation is now as shown below
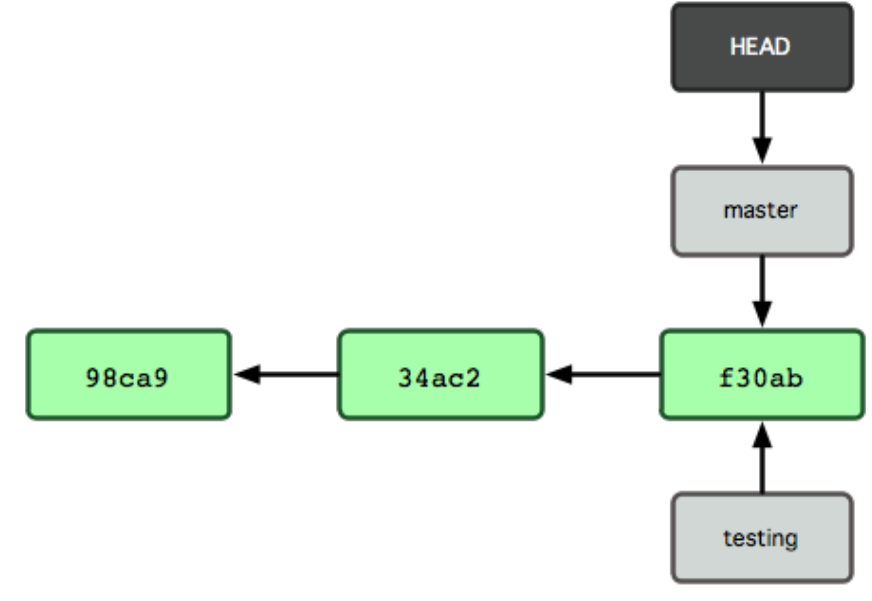
Fig. 19 Source: Chacon & Straub, ProGit (2014)#
In the image above, we notice that the primary branch of the repository is labeled as master, while in the repository that we just created, the primary branch is labeled as main. Indeed, before 2020, the convention was to use the label master for the primary branch of a repository and, because of that, some projects still use master as label. Since then, platforms like GitHub are gradually moving towards using main instead. More about this renaming can be seen in this guidance material.
Git switch#
When starting a new repository, it only has the main (or master) branch. If the reader is following the previous commands, the newly created branch is called “testing”, and the HEAD points to the main branch. Because the HEAD is currently at main, if we make a new commit, it will be inserted into the main branch instead of the testing branch. If we want to change the testing branch, we have to move the HEAD with
git switch <branch_name>
Note that branches can diverge in commits (this is basically the whole point of branches). We can then jump between the branches using switch as needed.
Pro tip: creating and switching to a branch at the same time
It is convenient to create a branch and switch branches at the same time. In this case, instead of using git branch <branch_name> followed by git switch <branch_name>, one might simply do git switch -c <branch_name>. To help memorize these command flags notice the -c stands for “create”.
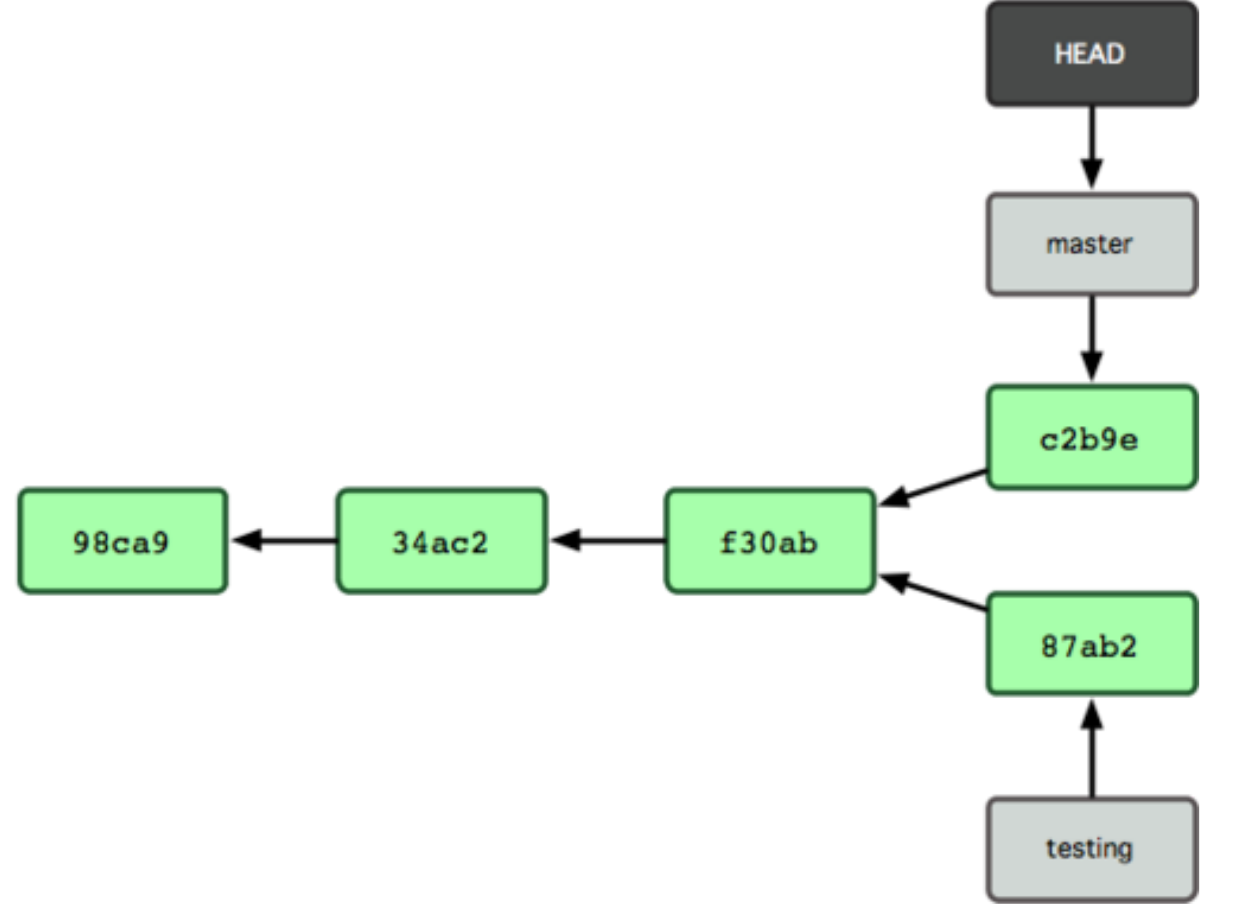
Fig. 20 Source: Chacon & Straub, ProGit (2014)#
Git restore#
Another useful idea is that of restoring files (or directories) in a current branch to their state on a previous commit. The state of the files can be restored either to the previous commit or to a specific one, passing a commit hash. In the example below, we restore a specific file to the state it had in the previous commit, as no hash was passed.
git restore <filename>
In this case, all unstaged changes made to the file would be gone. One important caveat is that while the changes subsequent to a specific commit are undone, the current branch is not updated.
Note
git restore <filename> restores files that have not yet been staged. If the objective is to restore the state of files that have already been staged, that can be addressed by adding a staged flag as in git restore --staged <filename>.
Git reset#
The previously mentioned restore command is similar to the useful git reset. While both are used to undo changes in a repository, git reset also updates the branch we are working on - it erases the commits and the git history after a specified commit hash. For our use cases, understanding the git reset command is sufficient: its objective is to reset the current state of the repository - or files thereof- to the state of a previous commit. This reset undoes the changes made from the point of a specified commit onwards, and there are different ways of doing so, depending on how robust this undoing process is. One example of a reset use can be seen bellow
git reset <commit-hash>
Notice that after this, all changes from later commits are added to the “staging area”. In this case, we are returning the repository to the state it had in the specified commit, but the same could be done only to a single file by adding a filename after the commit hash. It is clear that there are different ways of undoing changes to repositories and files in Git. For our purposes, the discussed strategies are sufficient. For a more extensive description, we refer to the supplementary material Git Basics - Undoing Things.
Git checkout#
The git checkout command is also a fundamental one. One particular example of its use is to look at the state of the repository at previous commits - such as looking at a snapshot of the codebase at the time. This can be done via
git checkout <hash>
As usual, hash refers to the commit hash and can be obtained with git log. Each commit represents a different snapshot of the project’s history with its own set of changes, so the differences between commits can then be examined and the changes can be experimented with, without affecting the rest of the project. As the Git story is left unchanged, we can always go back to the latest commit afterward.
Detached HEAD state#
As discussed, when we create a new commit, the HEAD pointer is moved automatically so that we are always at the latest commit of a given branch. When we instead check out a specific commit via git checkout <hash>, Git does not do this automatically. This means that after performing this command, we are in a “detached HEAD state”. As a consequence, if we make changes while we are checking out a previous commit, these do not belong to any branch. That is why git checkout <hash> is often used as an exploration tool only. In this case, after exploring the specific commit, if there are no uncommitted changes left, we can simply git switch to any branch, and HEAD will be attached once again.
If there are uncommitted changes, we can either commit them or discard them. Shall we decide to commit them, a new branch should be created and switched to, as follows
git switch -c <new_branch_name>
git add .                 # if we want to add every change
git commit -m 'Commit message'

git push origin HEAD      # push the current branch to remote
git switch main           # back to main branch now
If we need not keep the changes made while checking the specific commit, we can reset, then switch back to main, or any other branch
git reset --hard HEAD
git switch main
Additional comments on `git checkout``#
We have already mentioned that the git switch command is used to switch between different branches of a repository. Nonetheless, it is important to mention that previous to Git 2.23, released in 2019, git checkout was the command used for this functionality. The creation of the switch command has an important reason: checkout had three main unrelated uses, making it too loaded with functionalities. From version 2.23 onwards, two of these functionalities have been replaced.
For instance, the command git checkout <filename> can be used to reverse modifications that have not been staged while remaining in the same branch. Similarly, but with a totally different use, git checkout <branch-name> serves as a way to change to another branch we want to work on. For this reason, Git 2.23 addresses both these uses by separating them into git restore and git switch, respectively.
One of the key improvements with switch is that it is more careful about preventing us from accidentally losing work. For example, if one tries to switch to a new branch with git switch without committing the changes, Git will prompt us to either commit the changes or stash them before switching branches. In contrast, git checkout allows the switch of branches without checking for uncommitted changes, potentially overwriting the work.
Despite this creation of the switch and restore commands, there are still exclusive uses for git checkout, as we demonstrated. Furthermore, it can still be employed in all the contexts for which we introduced restore and switch. While we encourage the use of the modern commands in these scenarios, checkout will likely be found when searching for solutions to problems online, given their history.
More about the merge command#
Imagine we have made a branch to develop a new feature without disrupting the main branch others are also working on. Once we are happy with the code, we need to merge our branch back into the main branch.
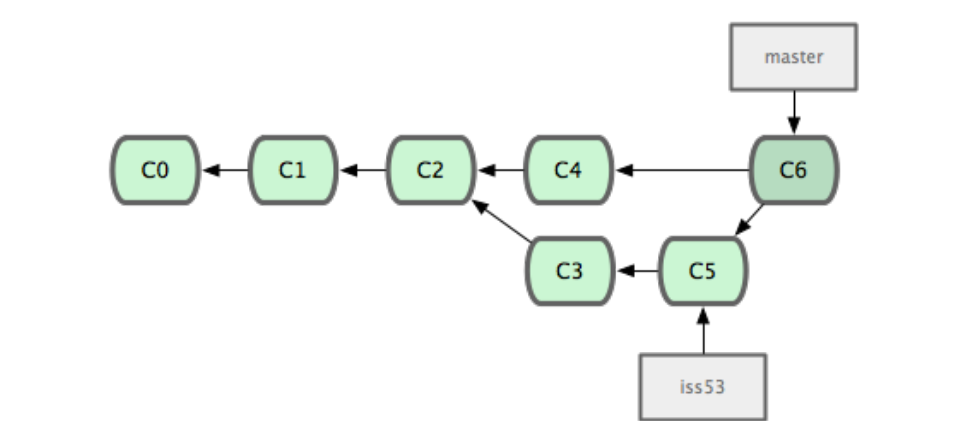
Fig. 21 Source: Chacon & Straub, ProGit (2014)#
To merge branches, we want to be on the branch we want to keep (typically the main branch) and do the command
git merge <branch_name>
So once we manage to solve issue 53 in the image, we do
git switch main
git merge iss53
Pro tip: switching and merging at the same time
Another convenient shorthand is to switch to a branch and merge it into the main branch in one step. This can be achieved via git switch -m main <branch_name>.
Note that to merge branches, Git tries to automatically understand what code to keep. If both branches that are to be merged have performed changes to the same code, we get what is called a merge conflict. These conflicts have to be resolved manually, meaning we choose which parts of the code to keep and which to discard. The first proper merge conflict can be a stressful situation, but just remember to keep calm and ask for help from a local Git guru if needed.
Finally, a branch can also be deleted via Git commands. At this point, the reader might have noticed the letter in the command flags holds meaning. In this case, we add the flag -d which stands for “delete” and can be seen below
git branch -d <branch_name>
If the branch has not been merged and the changes have not yet been committed, Git will give a warning and refuse the action. It is possible to overcome this refusal by using the -D flag (instead of -d), implying we want to force the deletion nonetheless. This should be done with caution! It is important to be careful when deleting branches, as it is a permanent action: in case the changes have not been committed, they will be lost forever. In spite of that, it is good practice to delete branches after they have been successfully merged to avoid accumulating useless branches in the repository.
Merge vs. Rebase#
We have mentioned the git merge command, which is used to combine changes from one branch into another (in most cases, we merge into main). There is another widely used command for this same purpose, called rebase. Despite their similarities, these commands use different approaches to accomplish this combination of branches and can have different effects on the repository history. A simplified comparison is that git merge is convenient for merging changes from a shared branch or a long-running development branch such as the main branch. On the other hand, git rebase is useful for creating a clean and linear history when working on branches that are not shared with others.
This main difference comes because merge can handle multiple concurrent changes to the same branch with a “merge commit” that has one parent commit from each branch. In contrast, rebase allows us to apply changes from the target branch to the feature branch before merging, creating a more linear history with no merge commits. In this last case, the resulting commits are placed after the target branch’s latest commit. Rebase often avoids what is called “spaghetti history.”
Git merge makes it more explicit to understand the development history of the codebase but it can also look complex by including multiple merge commits. On the other hand, git rebase creates a linear history with a simpler structure, but it can obscure the original relationship between the two branches.
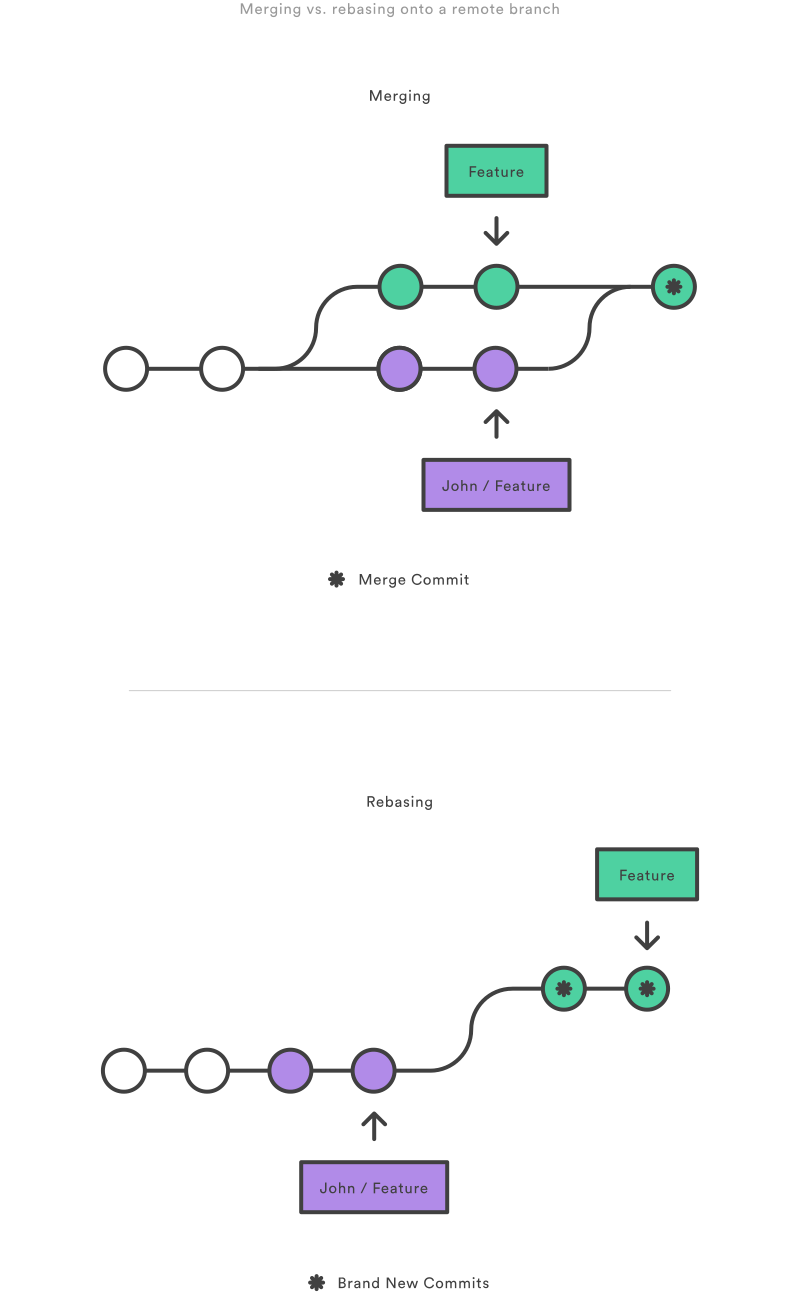
Fig. 22 Source: Merging vs. Rebasing#
A more extensive discussion about when to use each of these commands can be found in this article from Atlassian.
Pro tip: Visualizing Git Operations In Our Repositories
The above images representing branches and their histories can be useful in understanding what Git commands will do to our working repository. To help with that, there is a tool called Git-Sim which creates a simulated repository and performs Git operations on it, showing the resulting changes in a visual way. This enables experimentation with different Git commands without affecting our current repository. For a more in-depth explanation of how to use it, we refer to the article Git-Sim: Visually Simulate Git Operations In Your Own Repos.
Merge requests and pull requests#
Two other useful features are “merge” and “pull” requests. Often when working in a software team, there is a team leader that is responsible for managing the big-picture view of the whole codebase. The different developers on the team handle different tasks and often do their development in separate branches of the main code. Once they finish a task, instead of simply merging it into the main branch, they make a merge request. This request is automatically sent to the team leader, who can then review the changes to be merged. After reviewing, they can either accept the request, make additional comments or requests to be carried out before the merge is acceptable or deny the request.
Pull requests are similar to merge requests: both are ways of requesting that changes from one branch are integrated into another. The two terms are often used interchangeably, as they are different ways of looking a the same situation. Pull requests are typically used in a distributed development workflow, where each developer has their own fork of the repository. In this case, a pull request is used to request the owner of the original repository to pull changes made in a forked repository into the original repository. If we, for example, find and solve a bug in an open-source project, we will not have write access to that repository. In this case, changes cannot be pushed immediately. Instead, we make a fork of that repository, add our changes and then open a pull request for the repository owner.
In addition to the similarity between the terms, GitHub’s “pull request” feature is equivalent to GitLab’s “merge request”. Quoting a GitLab article,
“Merge or pull requests are created in a Git management application. They ask an assigned person to merge two branches. Tools such as GitHub and Bitbucket choose the name “pull request”, because the first manual action is to pull the feature branch. Tools such as GitLab and others choose the name “merge request”, because the final action is to merge the feature branch.”
Commit often!#
For Git to be useful as a version control system and not just an online backup, it is important to commit often. The more often (within reason), the easier it is for others and even the same developer in the future to understand how the project changed over time, facilitating knowing where potential errors occurred.
Each commit should also have a commit message that explains the changes made. The commit message should be a single sentence explaining what changed in the code, and that can always be traced back by looking at the commit log. This message should explain the big-picture of what was done instead of super specific changes. Was a new module or maybe a new functionality implemented? Did a bug get fixed?
In an ideal world, a commit should revolve around a single concept, similar to a paragraph in a text, which addresses one specific argument in a whole narrative. This means we should commit once we finish tackling a given problem and start working on something else. When writing a commit message, if the desire is to write “Did A and B and C” where these are completely different tasks, maybe there should be three separate commits. Note also that changes can still be added to a previous commit in case we forget to add a modification. This can be achieved via the amend command as follows
git commit --amend
The bigger a software project, the more important good commits and messages are. For small assignments, making incredible commit messages is not paramount, but still, as we try to lear good practices, we should strive to make at least decent ones.
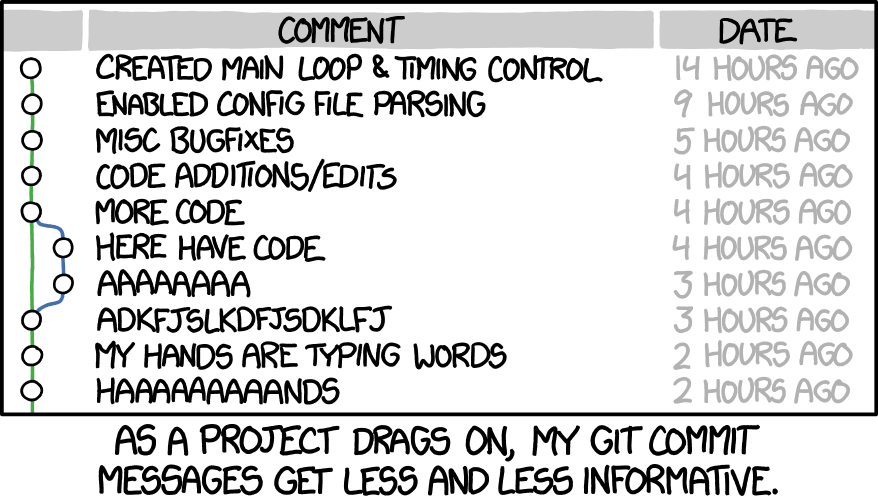
Fig. 23 Source: XKCD #1296#
Deleting files from Git#
Sometimes it can be necessary to remove files from a repository. This can be obtained by removing it from the local machine and the staging area and then committing this removal. To remove the file from the local machine and the staging area at the same time, we must use the command
git rm <filename>
Another possibility is to remove the file only from the staging area but not from the local machine, in which case we perform only git rm --cached <filename>.
Taking a step back#
We have just covered a lot of different aspects of Git and mentioned several things that might not even apply immediately in the following materials, so do not worry if those concepts seem overwhelming. Hands-on experience with Git is something that will come gradually by doing exercises and contributing to projects.
The most important commands are
git clone <URL>git add .git commit -m "..."git pushgit pull
Best practices for scientific computing#
We now conclude by looking back at the previously mentioned paper Best Practices for Scientific Computing by Wilson et al.
The most relevant points which explicitly address VCSs use are the following
Make incremental changes
(a) Work in small steps with frequent feedback and course correction
(b) Use a version control system
(c) Put everything that has been manually created in version control
In addition, the following points are also very relevant:
Plan for mistakes
Optimize software only after it works correctly
Collaborate.
Using VCS is, by its very nature, planning for mistakes. When optimizing code, it is very easy to break some functionality, so having good revision control is crucial to refactoring and optimizing code effectively. Lastly, collaboration on code should be, and very often is, done through Git or similar tools. By collaborating through Git, it is significantly easier to track changes over time, see who made what changes, and all revisions are accessible. This is a lot better than just emailing code back and forth—which some scientists still do!